This is my first entry because, even though I made the dress in the week before I wore it, it was pretty time and labor intensive with some trial and error. If anyone wants to try to replicate it, the more weeks, the better.
This was the end product:
 |
| Jack & Sally |
But it took some time to get there. It wasn't really expensive, but it took so much time that he had to do his own costume (though I take credit for the imperfect makeup - he actually fixed the disaster I had initially drawn on his face) including making the bat bowtie. So proud!
This is the step-by step of how I did it:
- Sketch (not shown)
I studied the dress back and front best I could and drew a simple back and front so I knew what to use as the base and where the colors and designs went. I wouldn't go into this without a sketch, however simple. I couldn't have made this just looking at pictures, but others might be better at that. - Gather Materials
I knew the base of the dress would be yellow. A good part of the front top is yellow, as are a sleeve and much of the skirt. So, I got 2 yellow shirts to make the dress. I then got the other colors: pink, blue, and black. Be careful and get the same size for all the shirts. I didn't, and it took some extra work to make things fit. Also, the black long sleeve was on clearance, so I got that, but I needed the blue and yellow to be short-sleeved because those are the sleeve colors!
I also got pins, a black fabric pen, a pincushion, needles, and thread. I ended up using thin crochet thread instead because it's thicker and the stitches really show, which I wanted. Embroidery floss also works, but it was harder for me to thread and I had less of it. All of this was a little over $20 at Michael's. But, the fabric pen was leftover from another costume and everything but the t-shirts is still usable.
- Cut a skirt
Take one of the yellow shirts and cut it just below the armpits to give the longest skirt possible. You can shorten it later if you need to. I didn't because I'm tall and Sally's dress really goes to her knees anyway.
Cat optional - Make yellow base dress
Take out the bottom hem from the intact yellow shirt. You can do this by cutting the thread between the fabric at the hem and pulling out the thread. Line up the skirt from step 3 to the bottom of the intact yellow shirt. I recommend pinning it in place and carefully trying it on to see how long it is. Adjust accordingly and sew the pieces together to create a yellow dress.
- Replace right yellow dress sleeve
There should be thread attaching the sleeves to the shirts. If you cut this thread, you should be able to pull it off and remove the sleeves pretty easily. Do this to the right sleeve of both the yellow dress you made in step 4 and the blue shirt. Line up the blue sleeve so it's where the yellow sleeve was. I recommend pinning before sewing the blue sleeve onto the yellow dress. I did a basic exaggerated slip stitch by hand for all my visible sewing. Basically, I used the black thread and made the stitches long so they would be seen instead of hidden.

- Remove collar
I decided to remove the collar from the dress (cutting the thread that held it on and pulling it off easily) because Sally's dress is not right up to her neck like these t-shirts fit. You can cut the neckline more, but I chose not to to keep it easier, not show too much skin, and not give the fabric more of a chance to rip.
- Start attaching other colors
This is the tricky part. Like the pictures show, I lined up shirts over the yellow dress and traced the shape I wanted. Then, I fit that shape over the yellow dress, pinned it, and sewed. The first part I did was the pink top half since it's so prominent. I took of the pink left sleeve (since the left sleeve is yellow), cut the shape I wanted on the front and back (I kept it attached over the shoulder), then slid the yellow sleeve through the armhole. I pinned and sewed.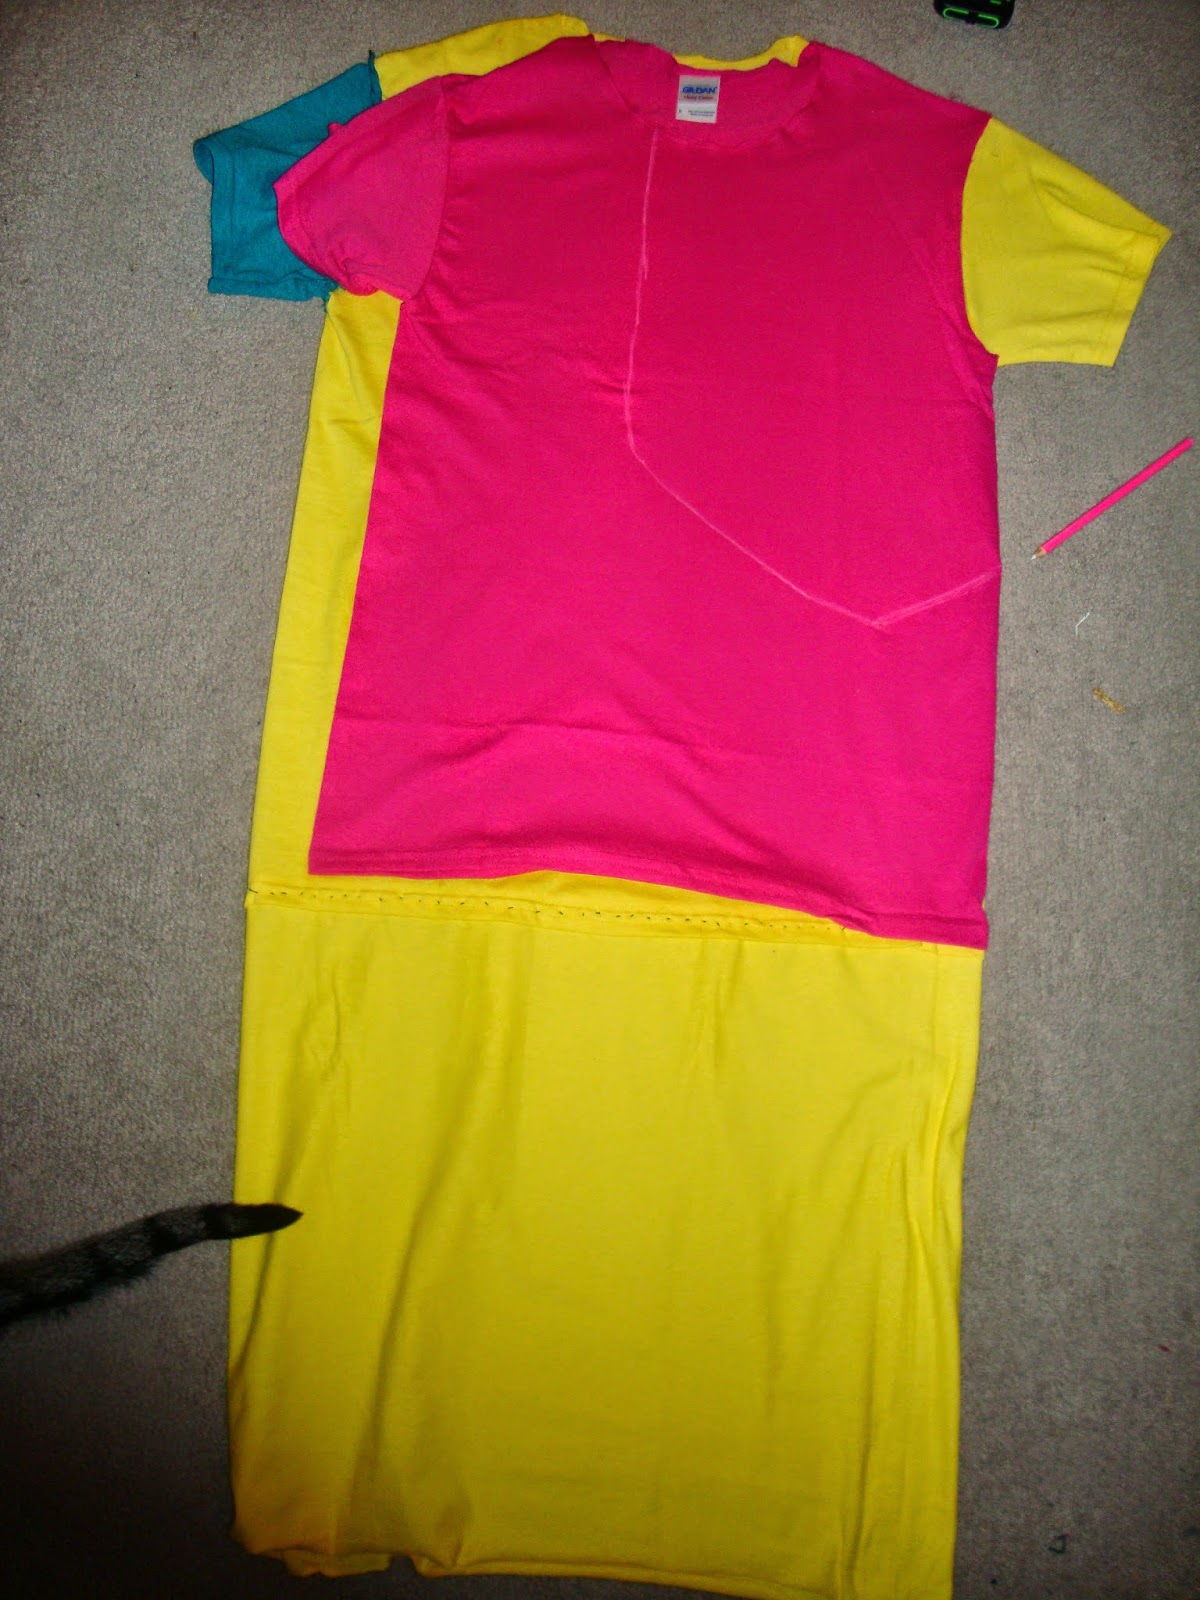

Then, I followed the same process for the rest of the colors. The only difference was where they fit on the dress. Some spots were harder than others, like the black one below. I had to pin it several times and still ended up with an unwanted yellow spot. But, because Sally's dress is really scraps of fabric sewn together, there's no reason you can't get creative if different patterns make it easier. It seems like even the official merchandise has her in different dresses.
Just make sure you try it on occasionally to make sure it still fits right! Worst case scenario, you take off the piece you sewed on and redo it with the same scrap or a new one. It doesn't need to be perfect though!
- Admire the almost-finished product
Make sure it fits how you want it to. It looks like there's a lot of puckering on mine, but it fit well enough for me to not fix that. The fit is up to you. The hard part is done. Now the fun part!
- Draw the patterns
Take the black fabric marker and draw the patterns where they belong, or where you want them. Be patient though. Fabric markers aren't as smooth as normal markers.
- Admire the finished dress!
The dress is done! Stand back and admire a job well done again.
Front .JPG)
Back - Finishing touches
This part is more up to individual discretion. I found light blue body paint and used it for my face. I used blue (couldn't find a lighter blue) tights for my arms and legs. I drew on the stitches with liquid eyeliner. Sally is blue, but plenty of people forgo that part. My shoes were $10 at Goodwill and I crocheted the leg warmers. You can use black shoes you have and find socks/leg warmers/tights with black and white stripes. There are a lot of options for foot and leg wear.

I hope you enjoyed this t-shirt costume and find that is was simply meant to be :)
 |
| Pretty close to the original! (source: disneystore.com) |
No comments:
Post a Comment